Writing new nodes
The first step to implementing a new node in pySPACE is to design the algorithm of the node. This is normally a pen-and-paper task which requires the designer to:
- plan the desired algorithm
- implement the algorithm using the simplified ‘pySPACE’ structure.
This process is highly simplified by the inheritance from
BaseNode. The new node can thus
choose to inherit a set of common methods and overwrite their content with
the algorithm specific content.
In the following tutorial, we will give a general overview of the methods
available for overwriting in pySPACE and discuss good-coding practices
in pySPACE. The tutorial itself is accompanied by a hands-on programming
tutorial which is available at templates,
on the documentation of the base_node as
well as by the unit testing tutorial and
the documentation of the GenericTestCase.
Contents of the tutorial
pySPACE architecture
The first line in each module/class/function docstring should be short, in imperative, without stop and explain, what it does. You should not copy it from elsewhere, because if you overwrite existing routines, they should be different and such differ in documentation. If you really can not help copying code, you should at least document, where you took it from.
Detailed information on documentation guidelines can be found
here. Before writing your own node, you should have
a look at it, because every node must be documented! You should also
have a look at the documentation of the nodes
package.
Note
Some parts of the guidelines, will be copied to this place, because of their importance.
Naming conventions
The nodes package supports automatic loading of nodes.
The easiest access then is via the
node chains in the
node chain operation.
Therefore, your newly implemented node needs a name.
To be detected as node, your node has to end with `Node`.
Node names are written in CamelCase.
Automatic node names are the class name and the class name without the
ending Node.
If you want to have extra names or backward compatibility after changing names,
you can define or extend a dictionary with the name
_NODE_MAPPING at the end of each module implementation.
As keys you use the new names and the value is the corresponding class name.
Be careful to use meaningful names or abbreviations, which are not already
in use.
When the documentation is generated, the available names are added automatically to the documentation of each node and additionally complete lists are generated to give information on available nodes and their functionality.
Base nodes should always include “Base” in their class name and if they are not directly callable they should not end with “Node”.
Finding the Module
Before implementing your own node, you should first find out, where to put it.
The nodes has several modules of algorithms
and you should check their documentation to find out, where your node belongs to.
As the next step, you should find out, if there is already a fitting module in there, which fits to your algorithm or needs only small change in documentation, to be fitting.
If there is no module, you have to open up your own new one.
Warning
Be careful, when creating new modules. The module name should be meaningful. The module should include some basic documentation and most importantly describe a general concept of a group of algorithms and not repeat the documentation of your new class. The integration of node modules and packages into the documentation structure happens automatically.
Note
When the documentation is generated, at the end of each module documentation, a summary of its functions and classes is generated. You should not do this manually.
Finding the Class Name
The class name is written with the above mentioned conventions. It is recommended that, before you start building a new class, you check whether there is already a class that already implements your desired algorithm. This does not only prevent redundancy but might also save you a lot of time. It might also happen that one of the pySPACE classes implements a very similar version of your algorithm and as such needs only small changes in order to suit your needs.
If you do not manage to find a class that implements your desired algorithms, you should check if your algorithm is developed for a very special purpose but could be generalized. In that case, please consider implementing the generalized version of the algorithm.
As a last step, you should decide on a short but meaningful algorithm name, which underlines the main characteristics of your algorithm and differentiates it from the existing ones.
Base Nodes
For some highly sophisticated types of nodes you can find a corresponding
base node in the package.
The visualization package is the best example
in this case.
These nodes define a special interface for their algorithms and you will only
have to implement some special functions for these nodes,
which can be found in their documentation.
Currently the default is, that your node is not inheriting from any special
generalizing base node but only from the basic
BaseNode.
When used in a processing chain,
this node is by default just forwarding the data, but implements all
functionality a node needs.
Basic node structure
The Main Principle
Every node, which is no base node should inherit from the base node.
from pySPACE.missions.nodes.base_node import BaseNode
Implementing a node now is nothing more than a process of carefully overwriting
the default methods of the BaseNode.
Depending on the complexity of your algorithm, this might be very easy or a bit
more complicated.
Note
The templates module contains some
hands-on examples of newly implemented nodes. You should also consult it
before building new nodes.
The Processed Data Types - Input and Output
For processing only, special input and output types are required
which are subclasses of numpy arrays.
All currently available types can be found in
pySPACE.resources.data_types.
The currently available data types are:
TimeSeries,
FeatureVector
and PredictionVector.
Once you have decided what type of input and output your node has, it is
recommended to hardcode these possible input and output types into the node
itself.
For input this can be done easily by setting the input_types variable
to whatever input your node accepts, e.g.
input_types = ["TimeSeries", "FeatureVector"]
For the output type, the procedure is fulfilled by overwriting the
get_output_type() function,
e.g.:
def get_output_type(self, input_type, as_string=True):
    return self.string_to_class("TimeSeries")
Warning
Since nodes are called via YAML syntax almost automatically, it is of the utmost importance that the input and output types of the nodes are mentioned inside the code. If the input/output types are not correctly set, it might happen that inconsistencies occur when the node is connected to a node chain and the wrong input/output is given to a node.
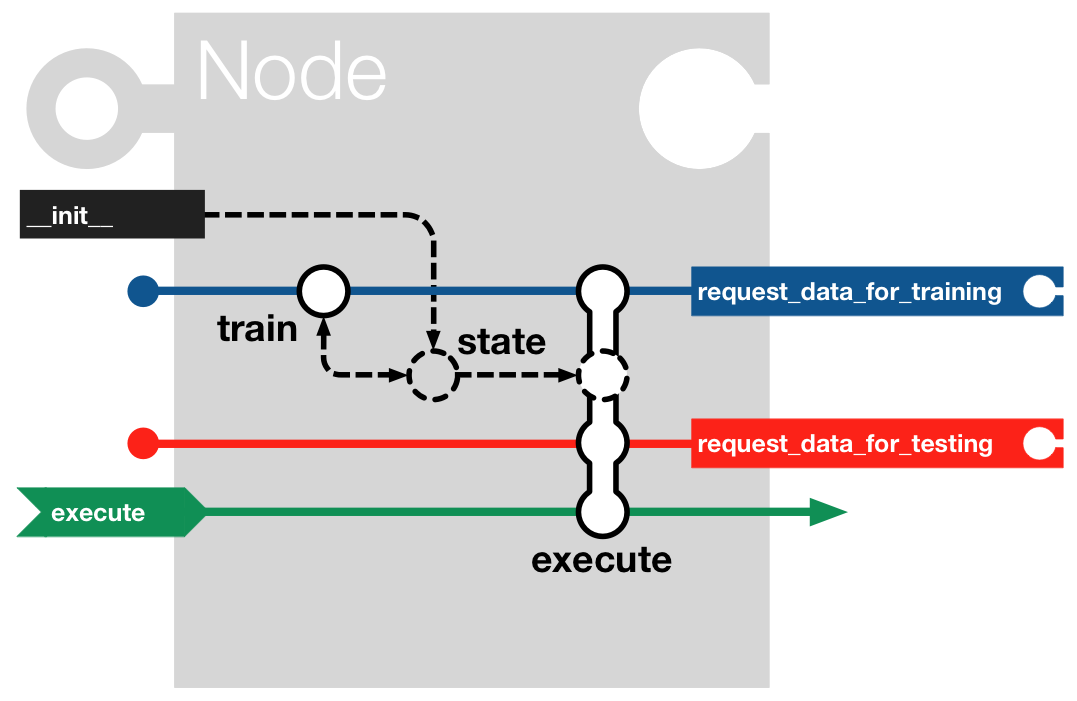
General Concept of a Node
The discussion of how to build a node in pySPACE starts from the basic theoretical constructs of machine learning. What this entails is that, through pySPACE, on can implement different types of nodes that make use of:
- supervised or unsupervised learning algorithms,
- trainable or non-trainable algorithms, or
- other extension options.
The BaseNode was built such that
it provides dummy methods for all algorithms. For a full list of the available
functions that can be overwritten for an algorithms specific needs,
please consult
the Base node documentation.
A general remark is that nodes are built such that they offer the possibility
of being connected one after the other inside a
node_chain.
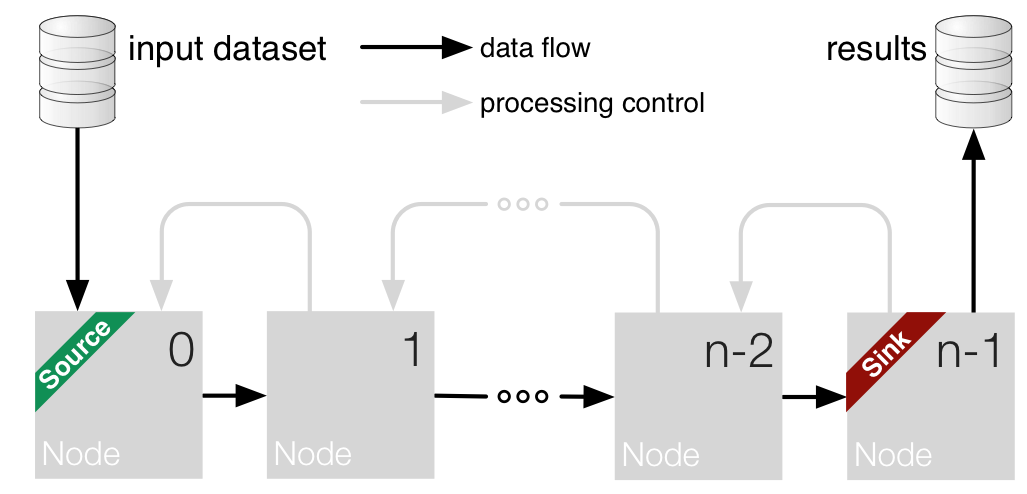
Integration of Nodes in a node_chain
As mentioned above, the nodes can be connected to one another by means of a
node_chain. The node chain can be described
by the following whereby input data is sent through a collection of processing
algorithms, each of which brings certain modifications to the original data.
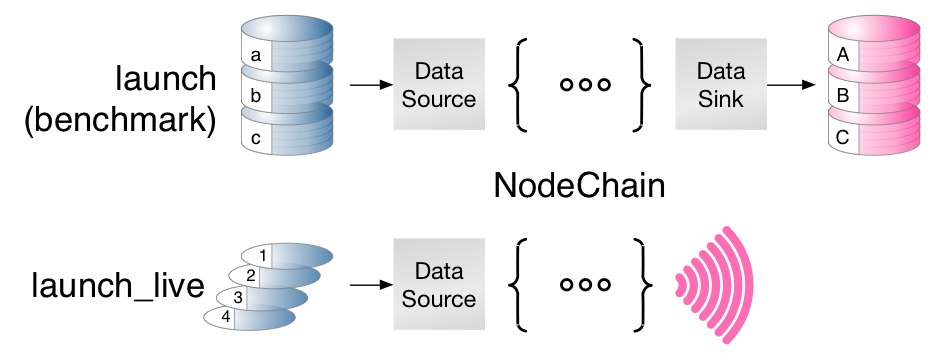
Usage of node chains
After the node chain has been constructed, it can be used in 2 different ways and namely for:
- benchmark execution, i.e. the test data set is static and saved to disk
- live execution, i.e. the node receives live data from a transmitter.
YAML syntax
pySPACE was built such that its components could be called through YAML syntax.
Thus, when building a new node, one must take into account that the parameters
passed to the __init__ of the new node will be read inside a YAML call to
the node.
In order to show a theoretical usage of the node, it is of the utmost importance that, once the node has been written, an Exemplary Call is appended to its documentation. This not only ensures that future users have an example of how to use the node but also serves as the basis for testing the functionality of the node as shall be explained later in Unit testing.
Exemplary calls
An exemplary call to a node is best explained by the means of an example
-
    node : BLDA_Classifier
    parameters :
        class_labels : ["Target","Standard"]
In the above, one can see the two components that must be part of each
Exemplary Call and namely the name of the node, which is made available
under the node parameters and the initialization parameters that the node
takes which are made available under a structured YAML dictionary
that bears the name of parameters.
The construct might seem oversimplified but that is exactly the point of using Exemplary Calls. The user should be able to easily call the nodes and not be cluttered by excessively long Python syntax.
Node chain
The above principle is then implemented when a node chain operation is called. A detailed explanation of this process can be found in the dedicated YAML tutorial.
Unit testing
The exemplary calls are important also due to their necessity in the automated
unit testing framework.
The testing framework
that pySPACE comes with is built on the Exemplary Call of each node.
The testing framework checks the node for the existence of documentation and
looks for the Exemplary Call.
In order to test the node, the framework then attempts to run
the Exemplary Call and reports the results.
Another important aspect of exemplary calls is that they can be easily used to check the output of the node given a specific input. This makes the testing of new nodes an extremely accessible process that requires the user to just customize the already available scripts.
More on unit testing can be found out in the unit testing tutorial.
Good coding practices
PEP8
Before programming a node or overwriting a method, have a look at its
documentation and the documentation in the
BaseNode, because otherwise
you might get unwanted side effects.
Furthermore, you should have a look at existing code and mainly follow
the PEP 8 coding style
Further Minor Information
- Randomization should be done be setting a fixed seed with the help of self.run_number to enable reproducibility.
- A special end of a node chain can be a sink node. It is defined by implementing the method get_result_dataset. Its function is to gather all data.
- The variable self.temp_dir an be used to store some data temporarily, e.g., for security reasons.